• Skip to primary navigation
  • Skip to content
AccessiCart

AccessiCart

Your guide toward web accessibility

  • About us
  • What We Do
    • Accessibility Maintenance Plans
    • Remediation Project Management
    • Accessibility Consulting for Development
  • Case Studies
  • Pricing
  • Blog
  • Contact

Accessible PDFs in Adobe Acrobat Series (ep 4): Document Tagging

One of the most overwhelming processes of PDF accessibility is document tagging. This is the process of telling the document what an element is on a semantic level. By “semantic,” we mean elements are identified correctly at an internal, code level. For example, you can make text LOOK like a heading by increasing the font size, but if it isn’t tagged as a heading then it won’t be usable as a heading and won’t show up in a document’s bookmarks as a new section. However, if you use the formatting provided by most word processors (like headings, lists and tables), software will recognize these elements as they’re intended. This allows the structure to be programmatically determined and translates this information to assistive technologies. This same logic applies to your website content. 

We’re going to be upfront with you in this post, it doesn’t have a happy ending (yet). There are outstanding issues that exist at a core-PDF level that require either excessive unconventional tactics and/or sacrificing accessibility in one way or another. So a lot of the purpose of this blog post is to make you aware these issues exist. 

Episode list

  • Ep. 1: Intro and Series Overview (the basics)
  • Ep. 2: Using the Accessibility Check Tool
  • Ep 3: Reflow and Reading Order
  • Ep 4: Document Tagging
  • Ep 5: Conclusion

Helpful Adobe references

  • Adobe Acrobat keyboard shortcuts
  • Using the Reading Order Tool
  • Overview of the PDF Tags

Definitions list

  • Acrobat – referring to the full program Adobe Acrobat Pro DC
  • PDF – Portable Document Format
  • SEO – Search Engine Optimization
  • Ctrl+4 – Toggle reflow view

Creating tags and reading order manually

We find the most dependable way to manually tag a PDF is by going straight to the Reading Order option in the Accessibility Task pane (or by pressing Ctrl+Shift+U on your keyboard). Unfortunately, this process can’t be done using a keyboard so the following instructions will only be for mouse users (we’ll elaborate on an alternative method for keyboard users next in Auto-tagging and modifying tags).

As we discussed in our previous post, “Accessible PDFs in Adobe Acrobat series (ep 3): Reflow and reading order”, reading order is incredibly important, especially if your PDF is complex like a newsletter or infographic. By manually establishing a reading order, you tell assistive technology in what order to read content to users. You’re also able to establish necessary elements as decorative features so they’ll be ignored by screen readers. And fortunately, when you manually establish a reading order, you’re also tagging your PDF! 

If your document already has tags in it you wish to clear, select “Clear page structure” from the Reading order dialogue box. Now use your mouse and begin by drawing a rectangle around the first item in your document and selecting its corresponding tag from the dialogue box. Similar to HTML tags, PDF tags are intended to identify a document’s semantic structure so using the correct tag is extremely important. You can use Adobe’s Reading Order tool overview to review what each of the tags are intended for. Advanced PDF remediation for increased accessibility is also a comprehensive article that elaborates on additional bits and pieces of the tagging process.

This can be an extremely lengthy process and can take some time to get used to. The best advice we have is to just start. If you have some random editable PDFs saved on your computer, pull them up and begin practicing. Eventually, the process should become much easier for you and before you know it, it’s not a daunting task but just apart of your normal PDF routine. 

Auto-tagging and modifying tags (keyboard friendly)

Another way of tagging PDF documents is by initiating its auto-tag function and then correcting the tags. This method isn’t the most dependable. While yes, you can modify the tags themself via keyboard, modifying the reading order via keyboard is excessively laborious.

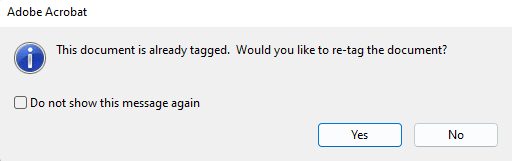
To begin the auto-tag process, select Accessibility from the tool pane (F6) and navigate to “Autotag Document” (which should be the first option available within the Accessibility sub-pane). If your document already has tags in it, selecting this will prompt a confirmation dialogue box to make sure you’d like to re-tag the document. 

Acrobat dialogue box: This document is already tagged. Would you like to re-tag the document?

The auto-tag process should only take a few moments, depending on how large your document is. 

Now, we need to open up the Tag Navigation Pane. Use F6 until you’re focused within the Navigation pane, then use your arrow keys to select the Tag Pane, represented by an icon that looks like a sales tag.

Acrobat Navigation pane icons with the tag icon highlighted

This pane will list out all of the tags the auto-tag function created. Your document title is probably set as a paragraph, headings are probably skipped, and there are probably some illogical wrapping. Autotagging can be helpful, but it certainly isn’t perfect. So let’s start fixing it! 

Press Tab to direct focus into the Tags pane. Using your arrows keys, you can navigate up and down the tags list which will highlight which tag you’re on within your document (mouse-users can click on tags for the same effect). Use the left and right arrow keys to un-collapse carrots of parent tag items. Navigate to a tag you would like to change and press Tab again which will take you into the information bar. 

Acrobat option pane with the option drop-down highlighted

Use Tab to focus on the Options icon and press Enter to reveal a drop down. Then use your up and down arrow keys to navigate down to Properties and press enter to access the Object Properties dialogue modal. Mouse-users can right-click on the individual tags to access this drop-down menu. In the Object Properties dialogue modal, you should automatically be focused on the “Type” selection drop-down. Use your up and down arrow keys to navigate the options until you find your desired tag. You can give the tag meta data and change the language of individual paragraphs from this pane. We do recommend giving your tags Titles as this can make organizing them later at a glance much easier. When you’re finished, navigate to and select “Close.” And that’s it! You will need to repeat this for every incorrect tag in the document.

Adjusting reading order via keyboard

While writing and researching for this post, we discovered a teeny-tiny paragraph buried in the Adobe help document Edit document structure with the Content and Tags panels (Acrobat Pro):

Choose Cut from the options menu, and select the tag that appears above the location you want to paste the cut tag. From the options menu, choose Paste to move the tag to the same level as the selected tag. Or choose Paste Child to move the tag within the selected tag.

We’re going to be honest with you, before discovering this we could not figure out the keyboard method of moving tags. But we tested this to make sure we were understanding it correctly, and sure enough! Adobe’s recommendation is basically deleting tags and pasting them where they should go. Far from efficient, but at least there is a method to be done via keyboard.

(Video) Introduction to PDF Accessibility Tagging in Acrobat Pro

For both manually tagging and auto-tagging, we find the following video (by Mike Crabb on YouTube) very helpful. It’s only about 8 minutes long and has closed captioning available. In the video, Mike goes through the processes of both PDF tagging methods in Acrobat. Despite getting a few heading levels wrong, he does a thorough job briefly explaining the tagging process while providing visuals.

Transcript for Introduction to PDF Accessibility Tagging in Acrobat Pro Video

[Presenter – Mike Crabb]

Introduction

Okay, this is a quick demo video to show you how to implement accessibility tagging into a PDF file using Adobe Acrobat Pro. So, I’ve downloaded one of my papers from Kai from a few years ago. This is taken straight from Overleaf. It doesn’t have any tags attached to it at all. If you take a document from Word, there’s a chance that it will already have some tagging inside of it as well. But what we’re trying to do here is to improve the overall semantic structure of the tags that exist in the document.

There are three different ways that you can do this. I’ll go through all three of these and try and explain the reasons why you want to kind of move towards the more advanced version as we do things.

Auto Tagging

The first version is to use the auto-tag function, and this is available just by pressing “Auto Tag” here. The way that you get to this is by pressing the button on the side that says “Accessibility”. Once this is done, it will try and tag the document for you, try and figure out what is a header, what’s a sub-header, and all these kind of things. And if we press “Reading Order”, it’ll actually start to pull all these things in.

Now we can see here that this probably isn’t the best way to do things. So it has our title at the top marked up as a paragraph tag. It’s tried to put our authors in as table data, and our abstract is done as a paragraph that should really be a header. All of these things are down in paragraphs even when they’re not really closing a paragraph as well. So there are lots of things in this that we could probably improve upon.

What we can do is, if we press “Reading Order”, we get this panel here that lets us see all of these things. And this bit over at the side, there’s a little button that says “Structure Types” that lets you tell, or that tells you, whether something is a paragraph or if it’s a link or a header. If you press “Page Content Order”, it will show you the order that a screen reader will go through this. And so again, you can see some problems here because what it’s going to do is it’s going to read out my title, then it’s going to read the name of the first author, the name of the second author, the name of the third author, then go down to the affiliation for the first, affiliation for the second, affiliation for the third. So there are quite a lot of things in this that we probably want to try and fix.

Two ways that we can fix this. First thing that we need to do is we need to open up a panel which will actually see the reading order. To do this, we press “View” at the top, then go to “Show/Hide”, and then go into “Navigation Panes”, and then there’s a little button here that says “Tags”. And what this does is it shows us all of the tags that exist inside of our document. Okay, what I’m going to do is I’m just going to clear this whole page structure because it’s a little bit of a mess. Okay, we can see what it will do here is eventually all of this stuff will disappear. Okay, and sometimes it is a little bit temperamental in what it tries to do. Okay, if I right-click this, I think there is a “Refresh” button. Or there used to be a “Refresh” button, or not.

Manual Tagging

So what I’m going to do is I’m going to tag this manually now. And to do this, I’m going to first draw a little box or my title and then I’m going to set that to be “Heading 1”. There we go, and then I’m going to draw another box around my first author, and I’m going to call that a “Paragraph”. Another box and my second author, and I’ll call that a “Paragraph”, and then another box or my third author, oops, and I’ll call that one a “Paragraph” as well.

So what that’s really doing, I’ll change it to “Structure Types” as you can see now that we’re saying, well, this is my header which is my title, and then we’ve got my three paragraphs underneath. And then I can go ahead and start tagging up my document. So I can again say that that’s an “H1”, and then tag this entire thing as a “Paragraph” that can be read and just by selecting all and then pressing a “Text Paragraph”. Okay.

So again, this is probably the kind of method that most people will use when they’re doing their document tagging. And there is a final thing that you can do as well to try and improve things a little bit further. Again, I’ll clear the page structure with this. Um, and then what I’ll actually do is I’ll try and clear the entire document. And so, “Clear Page Structure”, yes, just so that we’re getting rid of all of the tags inside of this. Actually, you know, it might be easier to just close the document and not save it and then open up the document again.

Manual Tagging (Advanced)

Okay, so what I’m going to do this time is I’m going to do the same that I did before. I’m going to start off with my panel here, uh, showing “Structure Type”, and I’m going to select this bit at the top. Oh, it’s not done. Sometimes that happens. Um, if it doesn’t select it properly, go back into “Reading Order”, press that little button here, and then that’ll let you draw your rectangles properly. And then I’m going to change this to be “Heading 1”.

I’m going to open up my “View” again. So again, go to “View”, go into “Show/Hide”, go into “Navigation Panes”, and click on “Tags”. It shows you all the tags that exist. If I right-click on this now and go down to “Properties”, it lets me select other different things that I can actually set for the type of this. Now one of the things that doesn’t exist as a default type but is one that we should really be using is “Title”, and we can actually put that in here. So we can set the title, so the type to “Title” and then press “Close”.

We can see now that it’s identified this is the title of the paper. What I can then do is I’ve got two choices with my authors. So I can either select all this as a single paragraph and do that, um, or I could select the author names and do it, and then kind of say, well, this is one paragraph, and then the affiliation is another paragraph. What I’m going to do is show you two different ways, uh, that you can do this now.

There isn’t a standardized way of doing this as yet, which is a bit unfortunate, and it’s something that we need to think about. But there are two different things we can do here. The first thing that we could do is we could set our author within a “Paragraph” tag and then right-click, go to “Properties”, and then change the type to “Author Name”, and then select all of their affiliation things, set that as a “Paragraph”, right-click on the “P” tag in the left-hand side, go down to “Properties”, change this to “Author Affiliation”, and close that. Then so that’s kind of method one.

Um, if you wanted to, another thing you could do is just select the entire author, put that in a “Paragraph” tag, right-click, go to “Properties”, and then change the type to “Author”. And again, what that’s doing is that’s really just enclosing all of the details about Michael Crabb inside of an “Author” tag.

The final thing that you can do, I’ll show you three just to, because we’ve got three authors here, is kind of taking the first one one step further. So we can take our author name, go to “Properties”, type “Author Name”, we can take the address that the author is at, give that tag so that it recognizes it, right-click, go to “Properties”, “Author Affiliation”, and then the last thing that we could do is take their email address, again, convert it to a tag so that we can select it, go to “Properties”, change it to “Author Email”. Okay, okay.

Recap

So that’s the basics of how we can actually start to do tagging. And I’ve showed you how to do this using a number of methods. So first using the “Auto Tag Document”. The challenge with the “Auto Tag Document” is that sometimes the reading order gets thrown out a little bit, and it can be a little bit of a challenge to see how things work.

I’ve shown you how you can do it using the standard tags that exist. So this happens just by you selecting an element, and selecting an element like this, and then you can, there we go, there we go, that works, selecting an element, and then you can pick one of the standard tags that exists here.

And the third way is once you’ve actually created a tag, you can right-click on it at the side, press “Properties”, and you can either select one of the existing tags that exists here, or you can type in your own one if you want to create more bespoke tagging. Okay, hopefully, that’s helpful. And if this has been useful, I can make some more videos in the future that kind of go through the tagging process that I do when I’m looking at PDF documents in a bit more detail.

Okay, thanks very much.

[End of transcript]

Tagging, reflow, and stylized documents

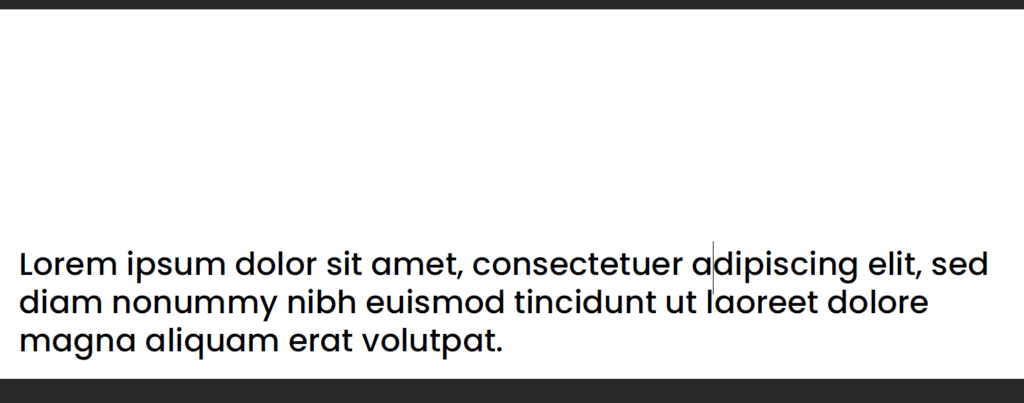
For more stylized documents with backgrounds and colors, you’ll want to keep document reflow in mind when tagging your document. Let’s look at this basic example:

White "Title" text on a purple background. Under the title is a white number 1 on a teal background with a lorem ipsum text paragraph to its right (will be referenced later)

In this image, “Title” is white text with a decorative purple background. Next in the reading order would go 1, which is also white text on a dark cyan background. The last item in the reading order is just plain black text on a white background. This is not an uncommon layout you may see in an infographic or newsletter PDF document. Your first thought may be to label the purple and cyan backgrounds as background artifacts, you have to remember they will be removed in the event of a reflow (as shown below, sort of):

In reflow mode, the original white "Title" and "1" are invisible because their backgrounds were dropped. So this is an enormous white space followed by the original plain text Lorem Ipsum paragraph

So now what? Unfortunately, there currently isn’t a great practice to fix this. You could group the background and the title together as a Figure; however, creates a semantically incorrect document and skips any bookmarks that should be associated with these titles. You can always add bookmarks manually, but that still leaves the incorrect semantics out there. Manually switching the tags will just cause these items to be invisible again.

The accessible PDF elephant in the room

This also leads us to the elephant in the room: User accessibility settings. If you press Ctrl+K on your keyboard, you will open up preferences. These are your universal Acrobat preferences, NOT individual document preferences. If you navigate to the “Accessibility” settings, the very first item should be “Document Color Options.” Users adjust these settings to make documents more readable based on their personal preferences. However, if your document includes colors that have been manually changed, a user’s accessibility preference settings will not affect those colors. So a once highly accessible maroon on white suddenly becomes a frustrating squint-fest on a black background.

If it sounds like we’re talking in circles, it’s because we are. PDFs are fundamentally flawed in that way when they really shouldn’t be. The accessibility potential is all there, the power just hasn’t been given to the end-user yet that would give clearer guidelines to the content creator. This is when the lines of what you can do to make a PDF accessibility get blurred due to numerous outstanding variables.

Conclusion

The more complex your document is (element-wise, not necessarily length-wise), the harder it will become to make it accessible. In some cases, it is impossible. However, we don’t think this is a permanent condition. It’s up to content creators to educate themselves so they can provide feedback to companies like Adobe who have data to work with to create solutions. Adobe is dedicated to increasing accessibility throughout its products; however, we need to help them by creating reports and contributing instead of just complaining or assuming it isn’t possible because something may not be at this very moment. With all of our help, completely accessible PDFs could very well be a reality sooner than we think.


AccessiCart logo

Our Accessibility Maintenance Plans help you remove barriers for people with disabilities and meet legal requirements with confidence.

Learn More about Plans

Published: June 24, 2022
Categories: Accessibility Tips

About the Author

Meg Miller headshot

Meg Miller

Meg "MeMi" Miller is a developer with over 15 years of experience. Their life-long love of tech and family members with disabilities inspired them to become an accessibility specialist to ensure the beauty of the Internet can be shared with all.

Need help on your accessibility journey?

AccessiCart Logo

AccessiCart offers accessibility maintenance plans for your website. Remove barriers for people with disabilities, widen your audience and meet legal requirements with confidence!

Learn more about Accessibility Maintenance Plans

Footer

AccessiCart Logo
International Association of Accessibility Professionals Professional Member profile
  • Home
  • About
  • What We Do
  • Blog
  • Contact
    • AccessiCart X
    • AccessiCart LinkedIn
    • AccessiCart Bluesky

Copyright © 2025 · AccessiCart. All Rights Reserved.

  • Accessibility Statement
  • Privacy Policy
  • Cookie Policy

Accessicart Intro to Web Accessibility

First Name(Required)
This field is for validation purposes and should be left unchanged.